Saturday, May 7, 2011
Silk Flower Pin {Tutorial}
Well, it's time for another tutorial! This time, I thought I'd share how to make this cute flower with your Big Shot. Once you are done, you can wear it as a pin, make it into a headband, or use it to decorate a gorgeous Mother's Day present instead of a bow. The possibilities are endless.
I actually wore mine as a pin attached to my blouse to Stampin' Up's Vancouver Regionals in February. Shelli Gardner herself commented on it. She told me that she loved it, and asked me how to make it. Needless to say I was extremely flattered, and was inspired to put together this tutorial to show you how to make your own.
You will need your Big Shot, and either the Island Floral Die, or the Fun Flowers Die. Please note, the completed pin and the headband shown in the finished pictures are made with the Island Floral Die, but the step-by-step tutorial I have created, shows how to make them with the Fun Flowers Die. I have made them both ways, and the turn out beautiful either way. Each of the dies create flowers that are a little different from one another, but both are gorgeous.
You will then need to choose your fabrics. I chose fabrics that were dark, moody, purples and blues such as Elegant Eggplant, Night of Navy, and Concord Crush. I then chose fabrics that had different sheens and textures. One is a stretch silk (the Elegant Eggplant), one is a silk shantung (the Concord Crush), and the other is an organza (the Night of Navy). It doesn't matter, as long as there are a variety of colours and types of fabric. I grabbed what was on sale, or in the remnant section of the fabric store.
Next, cut your fabrics into rough squares that will cover the die template that you are using. Then start cutting your flowers.
Cut out two of each of the three shapes of flowers on the die in each fabric (ie. 6 Night of Navy flowers - two of each flower, 6 Elegant Eggplant flowers, and 6 Concord Crush flowers).
When you are done, you should have 18 assorted flowers (but this doesn't really matter, as long as you have a good assortment of different fabrics, sizes, and shapes). Now the FUN begins........................................
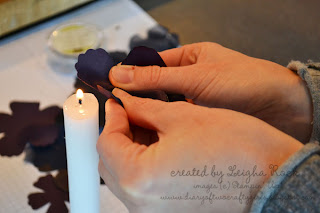
You need to take each of the flowers, and bring them really, really close to an open flame to melt (but not burn) the edges of each flower. As the edges melt from the heat of the flame, it will seal the fabric, and start to cause the petal to curl inwards. When my husband came upstairs while I was doing this, he saw the open flame, and just shook his head, and said "what are you doing NOW?" I'm so lucky that he is so awesome and puts up with my constant, crazy crafting quests :). Okay, maybe this wasn't the fun part...........when I had Natasha over to do this, she kept burning her fingers. (There was more than just a little whining going on -- just kidding Natasha) We still laugh about it whenever it comes up. In the end, Natasha persevered, and when we were done, our flowers looked like this:
Next, stack your flowers one on top of the other to create a pile. Poke through the pile with your Paper Piercier. I used an Antique Brad to hold everything together.
It will look something like this when it is done. Although the above tutorial was made with the Fun Flowers Die, this flower was created with the Island Floral Die. I simply used a safety pin to pin it onto my blouse. You could also get a little fancier and sew or glue a proper broach pin onto the back.
I also made a sweet headband simply by glueing the flower onto a ribbon covered headband. I cut out a small circle of felt with my Big Shot and glued this to the back of the flower to cover/finish the back of the flower and help provide stability to the flower.
Isn't my upline Jenn's daughter, Isabelle just the cutest little model? I hope you try this project, and leave us your comments, or links to your completed projects.............we'd LOVE to see them.
Subscribe to:
Post Comments (Atom)


4 comments:
Love it! Off to the fabric store to give it a try!!
Oh Leigha! This is AMAZING! What a gorgeous pic of you and Shelli too! Thanks for sharing..too bad I have boys.. maybe my nieces will be getting these:)
Very nice and vintage! And your little model is darling!
I love this tutorial! now i know how the flowers curl like that.. thanks my friend for this wonderful tutorial.. :D
Post a Comment